What's New Wednesday
Watch: 
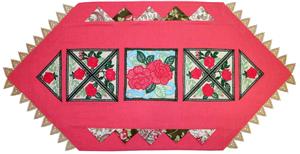
Country Rose Lace Table runner
If you have worked on freestanding lace projects before, this project should be very fun for you. Instead of a freestanding design, we used these designs to create an insert for a table runner. Inserts are easy to create and don't take nearly as much time as freestanding dimensional lace projects. This tutorial will show you step by step how to create the lace insert table runner. Have fun! -- Steve Wilson, Linda Winzeler and staff

1:
Select the designs you would like to use, and begin to plan the layout of the table runner. For this project, we are creating a table runner using one large square lace insert with ten triangle lace inserts arranged to each side of the square. Eight of the triangles are stitched together in groups of four to create a square pattern. The three squares will not touch each other when they are applied to the linen fabric we are using. This creates a nice insert effect, as well as allowing you to cover a larger area with less embroidery.

2:
Embroider the individual triangle lace pieces. Simply hoop a piece of soluble stabilizer, such as Wet 'n Gone, Aqua Mesh, or Aqua Magic. If you see holes develop in the lace with only one layer of stabilizer, we suggest using two layers. You will need to stitch ten matching triangle pieces. We used four "Large Multi Color Cottage Rose Lace Triangles" (Hdtrl1), two "Large Multi Color Cottage Rose Lace Triangles" (Hdtrl4), two"Large Multi Color Cottage Rose Lace Triangles" (Hdtrl2), and two "Large Multi Color Cottage Rose Lace Triangles" (Hdtrl3), for a total of ten triangles. Don't rinse out the stabilizer yet. If you do, you will wind up with uneven pieces to join. Instead, carefully trim the stabilizer next to the sections to create a neat edge.

3:
Prepare to join the pieces. Join two sets of four triangles each to create two squares. We used one of each different design in each of the squares.

4:
When joining two or more pieces of lace together, use a joining stitch on your sewing machine. A zigzag stitch may be adequate if it is all you have available, but can cause tunneling and an uneven seam. The best choice will be a stitch that has a needle drop in the middle, and a swing to the left and a swing to the right, like the ones pictured here. Be sure to match the upper thread to the thread color of the embroidered lace piece. Once the pieces are joined, rinse out the stabilizer and press the lace.

5:
Embroider the main large square for the center of the table runner. As for the triangle pieces above, use a soluble stabilizer such as Wet 'n Gone. We used "Large Multi Color Cottage Rose Lace Square" (Hdtrl5). After embroidery, rinse and press the lace.

6:
Lay out the lace pieces on the fabric you will use for your table runner. Mark the fabric as to where the designs need to be stitched down. A disappearing ink pen is helpful for this step.

7:
Our next step is to use two-sided tape to hold the lace pieces down while we sew. Since the fabric is going to be trimmed away later, you won't need to worry that the tape will be trapped beneath the lace.

8:
Now stitch the lace down using a zig-zag stitch on your sewing machine. Use thread that is the same color as the border of the lace insert. Stitch all the way around the design to fully attach it.

9:
When you are done stitching down the lace, turn the fabric over to the back side. Now we'll draw our cut line. Using a disappearing ink marker, draw a line 1/2" in from the stitch line. This will be the line that you will use to cut away the fabric.

10:
When the cut line is drawn, pinch the fabric together to cut your starter hole.

11:
Once you have cut your starter hole, cut towards the outer edge. Cut all the way around the design along the cut line.

12:
Cut diagonal lines in each corner from the cut line to the edge of the stitched line. This creates mitered corners that will allow you to fold the fabric back.

13:
Once all of the fabric is trimmed away, fold the 1/2" inch of fabric remaining behind the insert backward over the stitch line, and press it flat.

14:
Here is what the back of the insert looks like with the fabric pressed perfectly flat.

15:
The next step is to turn the piece over to the front and stitch down the fabric along the edge. This creates a more finished look and prevents the fabric from unraveling. Use a zig-zag stitch and match the bobbin thread to the fabric color.

16:
Once you are done with the topstitch, you can turn the fabric over to the back and cut the excess fabric away, cutting close to the stitches.

17:
Stop to admire your work. If you hold a finished insert section up to a window, you can see right through the lace to appreciate the beauty of the lace insert.

18:
We added fabric prairie point accents to the sides of our table runner, and trimmed the edge with "Cottage Rose Lace Trim" (Hdtrl11) to finish the project.


 Cottage Rose Lace Design Pack
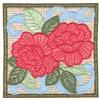 Large Multi Color Cottage Rose Lace Square
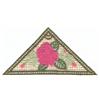 Large Multi Color Cottage Rose Lace Triangle
 Large Multi Color Cottage Rose Lace Triangle
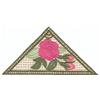 Large Multi Color Cottage Rose Lace Triangle
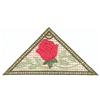 Large Multi Color Cottage Rose Lace Triangle
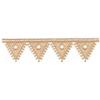 Cottage Rose Lace Trim
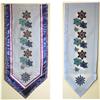 Snowflake Lace
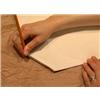 Planning a Layout For Your Project
 Lace Inserts


