What's New Wednesday
Watch: 
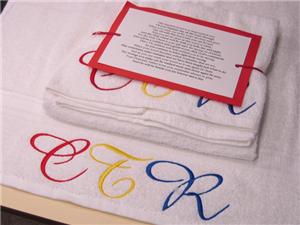
CTR Towels
A special towel for a special day, this CTR towel was created to commemorate an upcoming baptism. An ordinary white bath towel becomes a cherished memento with a reminder to choose the right in all things.

1:
For the lettering, I used uppercase designs from the Large Elegant Alphabet by Embroidery Central.

2:
I used embroidery software to merge the three letter designs into one file. To do likewise, you will need the capability to stitch in an 11" embroidery area; otherwise, you will need to re-hoop for each letter.

3:
To protect the stitches on the terry cloth during embroidery, use a topper. A water soluble topping film works well, yet will dissolve over time, so the terry cloth could work its way through the stitches later on. For keepsake items like these towels, which are unlikely to see a lot of use and laundering, that may not be an issue.

4:
Because this project involved a high contrast between the towel color and the design colors, I chose to use a permanent topper, which is available in an array of colors. If you are going to do likewise, cut rectangles of topper for each letter in a corresponding color. I used a 105mm x 90mm piece of red topper for the "C", a 105mm x 90mm piece of yellow topper for the "T", and a 130mm x 90mm topper for the "R."

5:
Mark the vertical center of the area between the bottom of the towel and the towel band, and the horizontal center of the width of the towel. On my towel, I placed the placement dot 2" from the bottom of the towel, and 13 1/2" from the sides.

6:
Place wash-away tear-away stabilizer covering the entire hoop. I used two layers of Floriani's Water Soluble Tearaway. The wash-away tear-away variety of stabilizers softens when washed, leaving the towel soft and comfortable.

7:
Planning to do the embroidery rotated 180 degrees, I hooped the towel "upside down," with the edge of the towel two or three inches from the bottom of the hoop.

8:
At the embroidery machine, clip the excess towel material aside to keep it clean and out of the way.

9:
Rotate your embroidery design 180 degrees before you begin stitching.

10:
Tape a piece of topper onto the towel, prior to stitching. I found that it works best if you tape all four sides of the topper in place. Be sure the tape is outside the embroidery area, and begin the embroidery.

11:
If you are using different colored toppers, stop the machine when the first letter is finished. Pull the excess topper away, so that it won't get trapped under the next letter. Repeat steps 10 and 11 for each of the letters.

12:
When all of the embroidery is finished, you can remove the remaining topper pieces.

13:
Gently tear the stabilizer away on the back.

14:
You can even tear away the stabilizer from inside the lettering loops. This adds a professional touch to the finished towel.


 Large Elegant Alphabet
 Jolly Holiday Design Pack
 Hemingworth Super Solv - Cold Water Soluble Film - 12 in X 11 yds
 Terry Cloth Towel Embroidery
 Rotating an Embroidery Design File
  Embroidering with High Contrast Colors
 Beach Towel for Summer Video


