What's New Wednesday
Watch: 
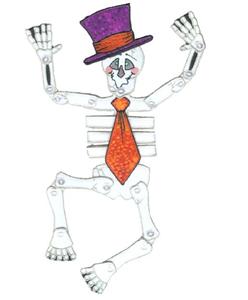
Skeleton Dangler
Imagine embroidery designs that you can hang on your wall! We were inspired by holiday decorations we've all had in the past. You remember those poseable cardboard designs that you would hang on your door? We've created embroidery designs that can be used in the same way; on your door, on a wall, on your refrigerator, or wherever you desire! Is your hoop too small for door-size designs? Have no fear! All of the elements of the design are buttoned together. The largest hoop you need is 5" x 7".

1:
There are two different types of files that are used to create the Skeleton Dangler. The first of these files is a standard embroidery file. An example would be HD-SK11B.

2:
The second type of file is called the cut file. The cut file is also an embroidery file, but is used to create your appliqué pattern. All cut file filenames end with the letter "c." Every standard embroidery file has a corresponding cut file so the embroidery file HD-SK11B will have a cut file named HD-SK11BC

3:
Dangler design pieces button together. How do you know where to place the buttons or button holes? We used a very simple system to make this as easy as possible. I fyou see a small crosshair in the design, that means a button is centered right on the crosshair. Buttonholes have been digitized into the design. You simply cut the hole open with a seam ripper or buttonhole cutter. Each piece will have either both of these guides or only one of them, depending on the piece.
4:
To create the danglers, measure your fabric using the cut file templates. The templates will give you a good idea for how much fabric to cut out. We allow about an inch or so of extra fabric to allow for error. On the skeleton, there are two pieces you may wish to choose different colored fabric for: the hat and tie.

5:
Once you have your fabric cut out, place it on top of the Stitch 'n Shape stabilizer and cut the stabilizer to fit the fabric.

6:
The next step is to fuse the fabric to the Stitch 'n Shape. The Stitch 'n Shape we use is fusible on one side. Use your iron set to medium.

7:
After our fabric is fused, it is time to create our appliqué piece. Hoop a piece of Appli-Kay wonder by itself in your 5" x 7" hoop. The Appli-Kay Wonder has one peel away side and one fusible side. For this step, the paper side is facing down in your hoop. You will be able to see the fusible side.

8:
Now you will place the fabric you have fused to Stitch 'n Shape onto the Appli-Kay Wonder and embroider the cut file for your dangler piece. The cut file will embroider a running stitch in the shape of the pattern.

9:
Once the pattern shape is outlined, remove it from the hoop. Now you need to fuse the Stitch'n Shape to the Appli-Kay Wonder. Turn it over (bobbin side up) and press it with your iron to fuse the layers together.

10:
Now you need to cut your pattern out. Cut right along the running stitch using good sharp scissors for a neat edge, otherwise the rough edges may show through the design's embroidered outline.

11:
Now you have finished a pattern piece ready for embroidery.

12:
Hoop a piece of Wet 'n Gone in your 5"x7" hoop.

13:
On the Wet 'n Gone, start embroidering the design that corresponds with the pattern piece you have made. The first step in the embroidery file will be an appliqué placement stitch. Once it embroiders this stitch, stop your machine.

14:
Peel the paper off the back of your pattern to expose the sticky side of the Appli-Kay Wonder. Stick the appliqué pattern piece down onto the Wet 'n Gone where the outline indicates.

15:
Now finish the rest of the embroidery design.

16:
Once the embroidery design is finished, trim the excess Wet 'n Gone from the edges.

17:
After the design is trimmed, use water to remove the rest of the Wet 'n Gone. You can just sponge the edges or rinse the pice completely and let it dry. The latter option results in a stiffer piece.

18:
The piece is nearly finished. The final step is to attach the buttons needed and open any buttonholes. A seam ripper can be used to open the buttonholes. Slowly work the point in, and then slide to create a slit inside the embroidered buttonhole.

19:
Due to the bulk of the finished pieces, you may want to use buttons that have shanks on them, create a thread shank for buttons that don't have them, or simply stitch your buttons on loosely.

20:
Repeat the steps above for each piece in the Skeleton Dangler, and assemble. You'll notice there are no button holes on the hat or tie. These are optional pieces, which can be applied to the finished skeleton with a tacking stitch.

21:
The head bone connected to the neck bone,
The neck bone connected to the back bone,
The back bone connected to the thigh bone,
The thigh bone connected to the knee bone,
The knee bone connected to the leg bone,
The leg bone connected to the foot bone,
All done!


 Holiday Danglers - Skeleton Design Pack
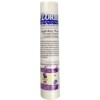 Floriani Appli-Kay Wonder - Fusible, 9" x 3 yds


