There are two ways to use the cutting file interface feature in Stitch Artist.
1 Begin with the cut file in Scan N Cut or another cut machine, Or just the reverse.
Then take to Stitch Artist to make the Stitch File .
2 Begin in Stitch Artist with the stitch File, Then take to Scan N Cut or Other Cut Machine for the Stitch File
Stitch Artist also provides for interface with other brands of cutting machines, like the
Studio files. Only the Scan N Cut machine is referenced in this tutorial.
In Scan N Cut Canvas:
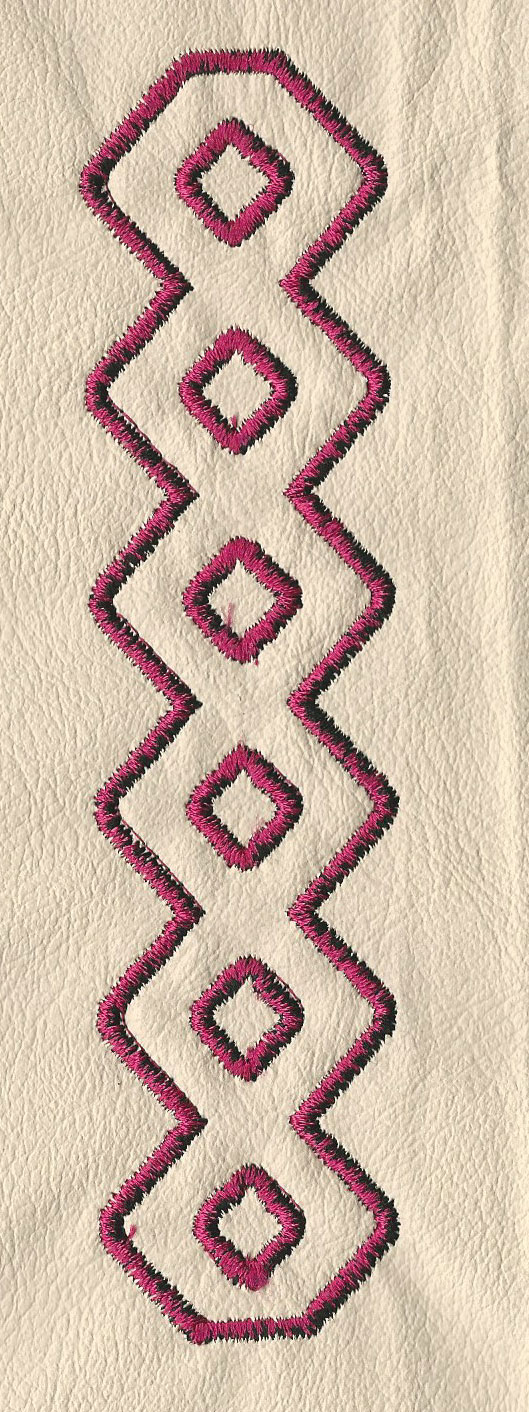
Open a new file and bring in a shape of your choice. I used a Border Double Diamond shape. It comes in on the screen in a long row of diamonds. I needed for my row of diamonds to fit my 5 x 7 inch hoop so I needed to resize the existing image. There are two ways to do this:
1. You can go to the Properties box and just put in the dimensions you need. However choosing this function will resize the entire line of diamonds, not take away diamonds from the line.
2. I wanted six diamonds sized 1.50 inch by 6.50 long. To do this I had to “cut off” a portion of the existing line of 10 diamonds. (see separate instructions for doing this.)
3. When you have the size correct and like your design, Select all, Group, and Save the file to your projects page.
4. Next go back to the Projects page and click on download file. Put a USB tick in your computer and on the pop up screen for the download.Right Click on the file name and choose “Save Link As” in the folder of your choice.
5. You can either cut the file now, (following the SCN procedures for cutting fabric) or wait until you have the Stitch Artist portion completed and then go back to Scan N Cut Canvas and download the cut file to your USB Stick and proceed to cut the pre-cut portion. Also Save the file to your computer so you can pick it up in Stitch Artist.
I elected to wait until I finished the Stitch Artist portion.
In Stitch Artist:
2 Bring in the file to Stitch Artist by clicking the Vector button at the far left of the Tool Pane and click on the file where you have it saved. Make sure the hoop size is what you need for the file. Note: Check the width and height of the file at the bottom of the screen to make sure it came in correctly. It is important that the Stitch File and the .fcm file you brought in are the same size in order for the applique to sew out properly. If the size is off go back and re-enter the design. This is how it looked when I brought the file in. Notice that “Artwork with No Stitches is checked, meaning that no stitches have been applied as yet. The diamonds in the Object Tree appear okay here. Before doing anything else you should check for open objects. You may or may not see any open lines, but if you do there are two Options available to fix the problem. If you do not see any broken lines skip this section.
The easiest way to check this is to assign a simple Run stitch (no need to set any properties, just click on the Run Stitch Button in the Tool Pane). It will apply a run stitch.
Note: If a node is hidden under the Entry/Exit stitches it may be difficult to see the break. You can carefully move the Entry/Exit out of the way and perform the same Option that works best for you on the other Objects, and then move the Entry/Exit points back into position.
All may look well in the design window, but look over to the Object Tree and see where there are open lines in all the inside diamonds and a small opening at the bottom of the large outside line. Option #1 First go to the Object Tree and select the first Run Object in this case Object 1.1, a small diamond at the top of the design. (Step #1) Click on it to select it. (1) Then Click on the Red Circle with a Line in it at the top of the tool pane. (Step #2).
If this does not fix the problem go to Option #2 below.
Step #2
Option #2
Click on the node at the beginning of the break and Right Click. This will bring up a menu. Click on Curved. This should close the line for you. Right Click Here and Click Curved You should see the line close here and in the Object Tree to the Right If this works, then go to each of the remaining objects and do the same procedure, Click on the node, then Right Click and choose Curved.
If you do use either of the Options for correction, when you are done you need to put the Applique function back instead of the Run. Follow the steps below.
There is one other correction that may or may not be needed. This happens when you first bring in the cut file.
If you have “holes” like the inside diamonds on my example, they may not show up when the file comes in. If this happens, you may need to use the “Combine Holes tool to correct this and make the design all one. I did not have to use this tool, however there is an excellent video from Lynnenew at Denver Sews Collective. Her tutorial “Making an Intricate Applique Possible with Stitch Artist and Scan N Cut” covers the reverse method from this tutorial.
Select All, Choose Applique, and set all the Properties Border, Pre-Cut, Position, and Material Settings.
(Your choice here)
Border: I chose Satin Topstitch Density 5, Stitch Width 3
Fabric Preview: I left Off (So I could see the diamonds in the middle)
Pre-Cut: I Checked because this is pre-cut from Scan N Cut
Position: I left the inset at zero so that the pre-cut would fit exactly on the position line
Material: I checked and set at Inset 1.4 so that the Material Stitch will catch the pre-cut fabric
At this point I selected All and the Color Properties box appeared. Note that there appear to be many colors, Applique Position, the Top Stitch, then Applique and Top Stitch all the way down.
5 This indicates that the Applique Stitches will stitch separately for each object, and will create too many color stops. This is more readily visible if you run the Stitch Simulator; you can see all the color stops in the top bar of the simulator.
To correct this first try selecting all and running a Color Sort. This is how it should look now with only two colors. You can change one color to make a better contrast so it is more easily seen.
Important: Note: Also at this point you should run the Stitch Simulator to make sure all the objects are stitching out correctly and that there are no breaks in any of the objects. If you do see breaks, STOP NOW AND APPLY FIXES: (See Table for the Fixes Above)
If you do not see any breaks, then proceed with step 6.
6 If you have the Density Repair function, you could run it here. If you do not, it will be okay. Density Repair just looks at a file and eliminates any unnecessary stitches, cleaning up the file. However the file will stitch out even if you do not have this feature.
7 Save the file in a Stitch File of your choice and go to the machine to stitch it out.
8 After the position stitch completes the machine will stop and you can apply the pre-cut applique piece. Do this WITHOUT TAKING THE MATERIAL OUT OF THE HOOP. The use of a small mini iron helps to secure the sticky back of the pre-cut applique. I used a Clover Mini Iron II for this purpose.


Melissa l.
The applique design is just wonderful, i think we can also use digitizing for it too.