(0)
BBB Accredited Business

© 2024 Embroidery Central


Document does not exist or has been removed from the system.

Kirsten S.

If you're into puffy foam on your wearbles, John Deer's Embroidery Legacy is having a webinar this Saturday on puffy foam. You don't need software to participate. If you're a digitizer, you can learn John's techniques and translate them to the software that you use. If you're a stitcher, you'll get valuable insight into how puffy foam designs are created -- and that will help you to stitch them! Here's the link with more information and registration: https://www.digitizingmadeeasy.com/embroidery-digi...

Please Login to comment on this post.

Tristan T.

Hi there,

after having months of successful designs, I am back with a new issue that I can't seem to solve.

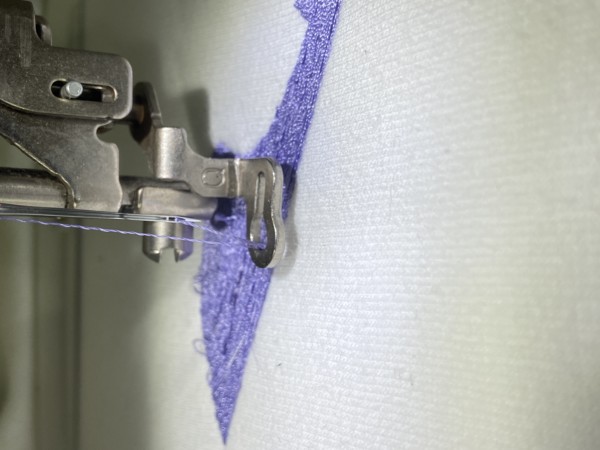
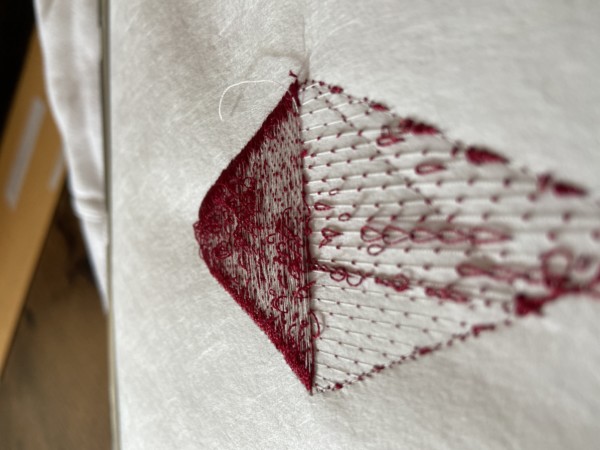
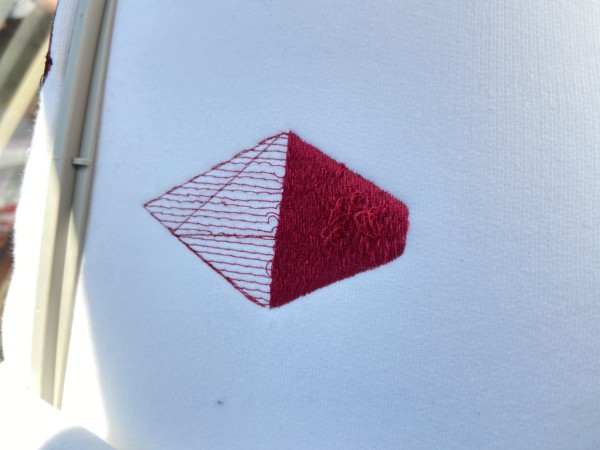
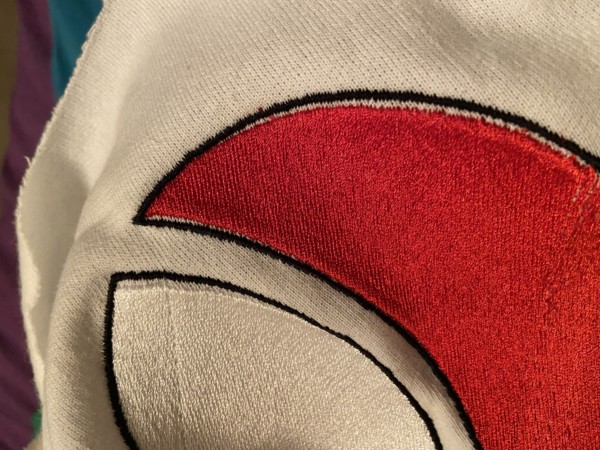
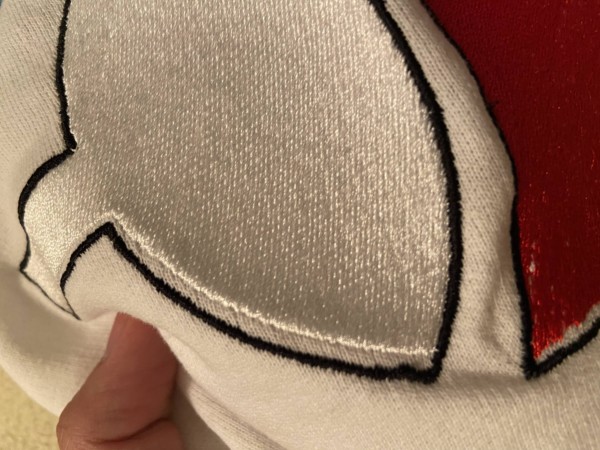
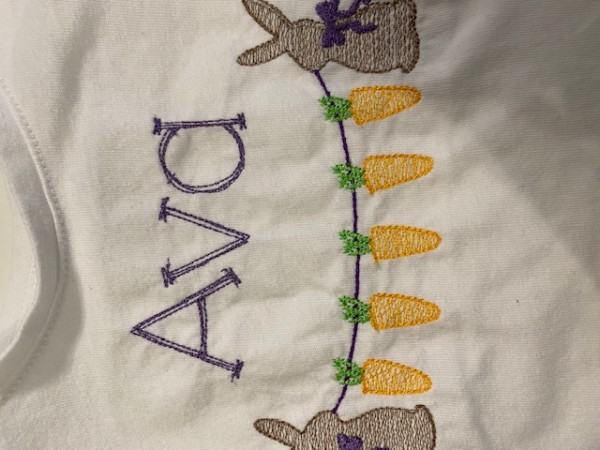
After a couple of minutes of stitching, the upper thread will somehow run through the needle hole a second time, and it appears that it doesn't continue to stitch onto the fabric.


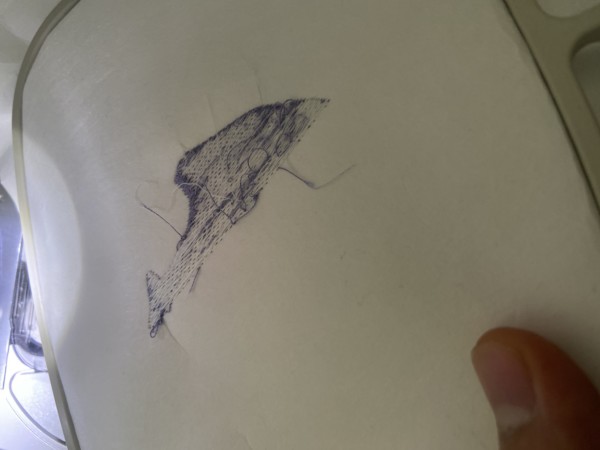
On the bottom, it looks like a version of bird-nesting is happening, but only every couple of stitches.


We've essentially tried everything and have run out of options, we've deep cleaned our machine, tried adjusting upper thread tension - loosening didnt do anything, tightening seemed to help but it would shred the upper thread if too tight, we've adjusted the bobbin case tension as well but that didn't seem to do anything either. I've also tried using different spools of thread but the same issue persists.


Does anyone have any ideas as to what's going on, and/or how to fix it?

Thank you.


Please Login to comment on this post.

Kirsten S.

Hi Tristan,

Thanks for posting photos of what is going on. I've seen this before.

It looks to me like your thread is shredding either in the bobbin area or as it goes into the needle. I suggest changing your needle to a new sharp one. Check the throat plate for any burrs or rough edges. A rough spot can wear on the thread as it passes, causing it to shred. Needle breaks can cause rough edges and burrs in this area. There may be a burr or rough edge on the bobbin case or somewhere in the bobbin area. Change the bobbin case, if you can.

Please Login to comment on this post.

Tristan T.

Hi Kirsten,

I tried replacing the needle, as well as looking for burs or rough edges. There were a few which I sanded down and polished up, however that didn't seem to fix the issue. I also had a spare bobbin case which I replaced yet I'm still having this issue. I've tried loosening and tightening the upper thread tension again. Loosening seems to worsen the problem, and tightening breaks the upper thread.


Any ideas as to what is going on? It looks as if the bobbin thread is not being pulled/tightened so the upper thread is placing loosely.


Thanks.

Please Login to comment on this post.

Kirsten S.

Well, it is possible to right no bin case tension. What type of machine do you have?


Please Login to comment on this post.

Tristan T.

We're currently using a Brother Pe770!

Please Login to comment on this post.

Kirsten S.

I see. I think we've already been over bobbin tension. It might not hurt to check that as well. However, it would make sense that the bobbin would not be pulled sufficiently if the upper thread is shredding and not coming through the needle properly to pick up the bobbin. It might be time to have a technician go over it to find any burrs or stray threads that we've missed.

Please Login to comment on this post.

Tristan T.

Yes, bobbin tension seems to be fine, and we've continuously adjusted to see if it fixes anything but it doesn't. We've smoothed any burrs that we've found. Right now, it seems like the needle is re-grabbing the thread as it goes through the fabric, causing it to loop back into the needle hold. But we're also struggling with the upper thread shredding almost immediately now. We're gonna take your advise and get it sent in for repairs soon.


Thanks for your help!

Please Login to comment on this post.

Kirsten S.

You're welcome, Tristan. I hope this gets it back in working order for you.

Please Login to comment on this post.


Kirsten S.

If you're into digitizing embroidery designs for your wearables, I suggest a digitizing course. John Deer has an excellent one coming up in September:


John Deer's Beginner Digitizing Workshop

Please Login to comment on this post.

Tristan T.

Hi there,

New issue and question. After having many successful designs, the bobbin thread decided to randomly pop up every couple of stitches. We've tried everything from cleaning the bobbin case, tightening and loosening the bobbin case screw, changing needles, changing the upper thread tension, cleaning in multiple areas, but nothing seems to fix the issue anymore. We even tried replacing our bobbin case but that didn't solve the issue. Does anyone have any tips or tricks that we might be missing to solve this issue? We are working with a Brother PE 770.


Thanks in advance.

Please Login to comment on this post.

Kirsten S.

Hi Tristan,

The fact that the bobbin kind of randomly pops up seems to point to a random issue I'm thinking of a stray thread in the upper thread path, that moves and doesn't always cause the issue.

You might track results while varying the weight of bobbin you are using, and the brand as well. Some folks swear their machines only like a certain brand of bobbin. Make sure the bobbin is the right size (height as well as diameter).

bobbin case: there's a good video by Vince Arcuri on getting the bobbin case tension just right, rather than loosening, tightening, and not being sure if it's right or not. If you haven't seen that, check it out.

Please Login to comment on this post.


Tristan T.

Hi there, I'm very new to embroidering and we've run into countless problems. We've managed to solve almost all of them except for one persisting issue with the actual embroidering outputs. In certain areas, different stitching groups, usually different colors, meet up perfectly, yet in other areas we find that there are very large gaps. Any ideas as to why this is happening, and how we can go about avoiding it? We currently have a brother pe770 and are using the pe-design 10 software(in the software, the rendered stitch work appears completely solid and lines up on every side).

Thanks in advance!

Please Login to comment on this post.

Muhammad R.

You will need to increase the design pull for this. Then you will also need to arrange the underlay in the tatami fill. The first underlay will have to be doted run on the edges of the tatami. Then 2nd underlay put lightly tatami just like the net.

Please see this digitizing video

Embroidery Digitizing Expert

Digitizing Logo

Please Login to comment on this post.

Kirsten S.

This looks likes result of pull to me. The fabric and the thread pull against each other. That's normal. in creating a design you can compensate it for it by slightly overlapping the two areas or by adjusting the direction of the Stitches.

In embroidery you can help by adding a layer of stabilizer. Try using a cutaway and at least a medium-weight cutaway.

Please Login to comment on this post.

Tristan T.

I added compensation and it fixed the problem! Thank you so much!

Please Login to comment on this post.

Kirsten S.

Great vwork! I am glad it helped.

Please Login to comment on this post.


Maureen S.

Hi I have the old designer series V6 &V7.15 I am trying to install onto a windows 98 as that what compatible with but don’t know my security key I have my discs and manuals is there anywhere I can get these .This is a lockdown project as I haven’t used my 860 Toyota embroidery machine for many years thanks

If I need to buy new software what do people recommend ,I’m not new to embroidery I have several designs but all on floppy discs which iv learnt can be used via a usb reader ,I’m not a business just something I enjoy when I get the time ,any help and advice would be appreciated thank

Please Login to comment on this post.

Heather B.

Hi, Maureen. Welcome back to the world of embroidery. I'd recommend contacting your software's manufacturer for assistance in seeing if you can get your old software back up and running. If you need a recommendation of new software, we can recommend Embrilliance Essentials to you, which we sell here at Embroidery.com.

Best wishes with everything and please let us know if we can clarify anything on this.

~Heather
[email protected]

Please Login to comment on this post.


Victoria B.

Hi! I recently bought a Singer EM200 machine (my first embroidery machine) and figured out how to use it on a scrap fabric and feel confident I know the machine and how to work it. I'm having trouble embroidering a t-shirt though. I've watched several videos about it and most have said to "nest" the fabric around the hoop so the machine doesn't embroider the design through both layers of the shirt. But when I do this, the fabric gets in the way of the arm and the machine really isn't able to embroider properly. I may be overthinking this, but I was hoping someone could give me some tips for how to embroider a t-shirt successfully where I want to. Thank you in advance!

Please Login to comment on this post.

Kirsten S.

Hi Victoria,

You're right, dealing with garment fabric around the hoop is a bit of an issue, but you'll learn to work around it. Sometimes you can use binder clips to help hold the fabric together, sometimes you just have to sit by the machine, hold the fabric, and/or keep an eye on it.
Here's a video that shows you how to hoop a t-shirt:

Here's a tutorial that shows attaching the hoop to the machine:

I hope these are helpful to you!

Please Login to comment on this post.


Marie B.

Hi, I'm new to embroidering, I have a brother innovis 90e, I'm using iron on stabiliser I've learnt how to the basics, but when I go to put lettering on a t-shirt the letters look patchy or baggy, and if I do a smaller font its unreadable. I am using PE-Design 10. do u think it could be the programme?, there built in fonts? any help welcome, added pic to let ya see what im on about

Please Login to comment on this post.

Kirsten S.

Hi Maria,

Thanks for including a photo. As you mentioned, your results are better with larger letters. Lettering has limitations in thread. In print we can to super duper tiny, but in thread, our medium itself has more bulk, so we need to use larger lettering. What you have there on the bottom line does look very very small, and my guess is that the size itself is the main problem.

In your PE-Design, measure the width of a column in the lettering. If the column width is less than one millimeter, it's too small, and should be done in a running stitch, if at all. If you want to do lettering in a running stitch, you probably get to digitize manually, so my recommendation to you as you are beginning, is to stick to larger lettering. The column width limitation applies to all parts of the lettering, including serifs. In the upper lettering, for instance, there are serifs on the letters. If those columns are less than a milimeter, increase the size of the lettering before stitching out. You might consider switching to a different, non-serif font for some lettering projects, since this frees you up from concern over those generally smaller letter parts.

Another thing that will improve your results is to stabilize more. As a general rule, if an item is to be worn, you will use a cut away stabilizer. Since you're working on t-shirts, cut-away stabilizer is advised. You can use this in combination with the iron on stabilizer, if you would like. It will improve the look and the durability of your finished piece.


Please Login to comment on this post.


Katelyn M.

New to embroidery. Can anyone explain why the shirt looks wrinkled between the design? I'm using cutaway stablizer for reference and the shirt didn't look this wrinkled until after washing. Any advice?

Please Login to comment on this post.

Olivier V.

Yes, as the other members have told you, it's due to the fact that the light, thin fabric of the shirt has been pulled together by the dense stitching. Sadly, there aren't many ways to avoid it on thinner fabrics....

Please Login to comment on this post.

Monica D.

Katelyn, sometimes it just happens - especially with heavier designs, with a large stitch count. Also thin and/or delicate fabric can't support the dense stitching. So Kirsten is right, must be the shirt -from your preview it looks like a very light cotton.

Please Login to comment on this post.

Kirsten S.

Hi Katelyn,

It looks like something has shrunk or pulled in a little in washing -- probably the shirt.. Woolen pressing mats can be great for reducing the wrinkle effect after washing.

Please Login to comment on this post.


Nikki J.

I am brand new to embroidery. And brand new to sewing… seriously…LOL. I want to learn it all but I need to slow myself down, I downloaded some embroidery digitzing software trials but I'm lost and have a lot to learn. In the mean time I will pay for a digitizer for the few things I need until I find myself needing a lot. I have a logo that I want to embroider in 10x7, 7x5, and 3x2ish... what is the going rates on digitizing? Or is there more to it than sizing?

Please Login to comment on this post.

Heather B.

Hi, Nikki. Welcome to the world of embroidery! Regarding digitizing, we'd probably recommend comparing a few companies' rates. Here's some information on the companies we recommend:

Apex

PHONE: 877-935-7766
E-MAIL: [email protected]
WEB: https://www.apextransfers.com/

Or

Universal Digitizing
PHONE: 888-778-4803
WEB: universaldigitizing.com

Or follow the link below and look under the section "Digitizers":
http://www.embroidery.com/help.ec?docid=264

~Heather
[email protected]

Please Login to comment on this post.


Mark D.

Hey Everyone,

Nice info here but i want more to know something about Embroidery Digitizing, i'm looking for some best reliable and also affordable Embroidery Digitizing Services Providing Company in USA for my Business, i need some help, if anyone experienced the Best Quality Embroidery Digitizing Services Providing Company so please refer me suggest me

Thanks in advance

Please Login to comment on this post.

finest t.

QUALITY EMBROIDERY DIGITIZING IN USA - FINEST TECH SOLUTIONS

Finest Tech Solutions is a famous name in Vector & Digitizing industry. We’ve been serving the Vector Art & Digitizing industry since the industry is growing and most of the times our quality and on-time dedication speaks to our work. We are equipped with highly skilled technical staff, professionals , well-versed quality assurance team and advanced management for your orders. We use the latest technologies and the best materials to provide some of the highest quality services available in the industry today.

CONTACT US

EMAIL: [email protected]

Phone Number: 0014243895019

Website: https://www.finesttechsolutions.com/

Please Login to comment on this post.

Heather B.

Thanks for the request, Mark. Embroidery.com recommends Universal Digitizing Service:

https://universaldigitizing.com/embroidery/

~Heather
[email protected].

Please Login to comment on this post.


Ardell Stribling

I need expert advice on this hoodie jacket need expert advice on this hoodie jacket

Please Login to comment on this post.

Heather B.

Hi, Ardell. How can we help you on this? What problem are you having with this hoodie/jacket?

~Heather
[email protected]

Please Login to comment on this post.


Ardell Stribling

Any fashion lover would approve that embroideries on clothes do play an important role to maximize its beauty. However it is important to select the right embroidery boutique that provides quality and affordable embroidery designs.

Please Login to comment on this post.

Ardell Stribling

Embroidery has become a hobby nowadays. Everyone wants to learn embroidery and it seems really interesting, but it is not easy as it looks. It has it's own language which is quite difficult to understand.

Please Login to comment on this post.

Heather B.

It surely is a world into itself, Ardell. Please let us know if we can help you navigate any of the in's and out's.

~Heather
[email protected]

Please Login to comment on this post.


Lorelei A.

Hi! I do not know much about any of this so I was hoping someone with experience could answer my question. See, I am making my own letter man jacket for school. I have the jacket I plan on buying, but I would need to somehow put the H logo on it. I was wondering if this would be considered embroidery? If not, does anyone know what type of craftsman I would have to contact connect to have this logo made/put onto the jacket? Thanks!

Please Login to comment on this post.

Ardell Stribling

nice jacket.

Please Login to comment on this post.

mark s.

Yes This is definitely Embroidery Digitizing, This Is basically Applique Embroidery Digitizing which is used in clothing, I recently hired a Digitizing company (SBS Digit) for applique digitizing, they are good at their work.

Please Login to comment on this post.

Heather B.

Not seeing it closeup, Lorelei, I would guess it is either screen-printed or machine embroidery. If embroidery, it looks like an applique design. If you need suggestions of an embroiderer, follow this link and look under the section "Embroidery Companies' Sites."

https://www.embroidery.com/help.ec?docid=264

Best wishes!

~Heather
[email protected]

Please Login to comment on this post.


Allie H.

I am embroidering baby onesies and I am trying to do an appliqué and name. I have been using a cutaway stabilizer but I don't know how to cut it. If I cut it close to the stitches it is hard to cut around each letter and if I leave it in a square you can see it through the white onesie. I am not sure what to do! I've tried tear away but it tears before the design has finished being embroidered. Help!

Please Login to comment on this post.

Kirsten S.

Hi Allie,

For cutaway, I suggest cutting in kind of a soft oval shape, or following the shape of the design, just a cm or two away from the edge of the stitches. Then I would put something over it to soften the back, like Floriani's Dream Weave: http://embroidery.com/product.ec?productsetID=2016...
I also suggest that you have a look at Hemingworth's hot water washaway stabilizer. It is stronger than tear away, and with two layers, you will have the stability your design needs, and you can use hot water on a sponge to "cut" it out, even if you don't want to launder the onesie.
http://embroidery.com/product.ec?productsetID=9009...

Please Login to comment on this post.


Kristen B.

Embroidery looks amazing on any cloth and I appreciate it for sharing as this article is very interesting and helpful Keep updating about new things.

Please Login to comment on this post.

Heather B.

Thanks, for the feedback, Stuart.

~Heather
[email protected]

Please Login to comment on this post.


Penny M.

I am excited to be here in this group.

Please Login to comment on this post.

Heather B.

Glad to have you here, Penny!

~Heather
[email protected]

Please Login to comment on this post.


Marlyn J.

I am about to add digitizing to my art studio, I do graphic design for professional screen printers & embroiderers. I have a lot of experience using CorelDraw for the creative and a little using Wings for the digitizing. I know Corel dropped Wings in favour of Wilcom and then dropped Wilcom. I am torn between the Wings program and Hatch Wilcom, I was wondering if any of the members here are using either program and could offer some advice on which one I should purchase?

Please Login to comment on this post.

Haley F.

I was wondering, I am making circle applique for baby milestones, What would be best to put on the back to make them sticky (besides the stabilizer), to make them stick to their body suites?

Please Login to comment on this post.

Heather B.

Hi, Haley. A method we've done to attach patches is using a patch glue, which is available in most craft stores. One we've seen in our local stores is called "Patch Attach."

Follow the package instructions if you use some other product. If you're using Patch Attach, you'll want to apply the glue around the entire back edge of the patch. Allow the glue to dry the recommended time, then align the patch back on the body suit and cover with a pressing cloth. Press the patch with a hot, dry iron for 60 seconds. Then press the opposite side of the body suit for 30 seconds to make sure you have a strong bond.

You can also sew the patch onto the garment by hand or machine, which would skip the step of adhesive altogether.

~Heather
[email protected]

Please Login to comment on this post.


Please Login to comment on this post.