How do I send designs to my USB stick / thumb drive?
If you have successfully downloaded an embroidery design to a location on your computer, you can locate it there, and send it to your USB at that point.
Often, downloaded files come zipped together. This is particularly the case when you have more than one design or more than one format that has been downloaded. This video shows you how to unzip the design files and send them to your USB for use on your embroidery machine.
This video and steps provided illustration process in Windows 10:
At the bottom of your screen, click the file folder icon. This opens your File Explorer window.
On the left side of the window is a menu. Find "Downloads" there, and click on it..
Now find the embroidery download. If it is a zipped file, it will have a zipper icon on it. If it is not zipped, skip to step 9.
Click on the zipped folder. Then at the top of your window, click "Extract"
A little to the right and lower down, click "Extract all"
This brings up an option for you to select the destination for your unzipped files. Your computer can extract these files to your preferred location. If there is a particular folder where you usually keep your embroidery designs, you can navigate to that folder here in this window, and the computer will save those unzipped files into that folder. In this video, the designs are being extracted into the downloads folder.
Once the files are extracted, go to the folder where you extracted them.
Often the files are organized into folders. In this video, the design files are organized by format.
Open one of the folders to see the unzipped design files.
To select all of the design files, click the top one, press and hold the shift key, and click the bottom file. That selects all of the design files.
To select just a few, click one that you want, press and hold the shift key, and click the next one. Repeat for as many as you want to select.
Insert your USB stick, if you haven't already.
On the left side menu of your File Explorer window, you can see your USB stick.
With the right mouse button, click on one of your selected files, and drag them over to the USB stick, and release the mouse button. All of the selected files will be saved to your USB.
You can click on the USB drive to view and verify that the files have been copied there.
In the lower right part of your screen, find a caret button, it looks like this: ^ Click that to find the "safely eject" option for your USB.
Eject the USB stick, and you can insert it into your embroidery machine.
The illustrated steps below can be used in place of steps 12-17 above.
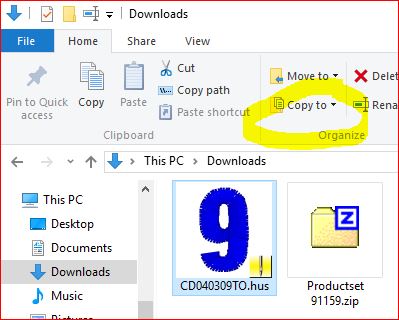
If your design is in your "downloads" folder, you can open the downloads folder and use the copy function to move it to your USB. Highlight your design, as shown, then click the "copy to" button at the top.
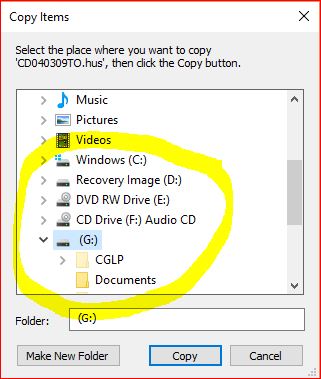
When you click "copy to" you get a list of options. If you don't see your usb in the list, click "choose location" at the bottom of the list. This opens a new window. Scroll down until you see "This PC" and the list of drives on it. Below,my USB is drive G. I highlight it (in blue) and click "copy."
Then it will copy your file to the USB drive.
In the lower right part of your screen, find a caret button, it looks like this: ^ Click that to find the "safely eject" option for your USB.
Eject the USB stick, and you can insert it into your embroidery machine.
 How do I download my designs?