


I have the foot are you still interested???
02/08/24 05:04 am MST
Please Login to comment on this post.
| Specifications | |
|---|---|
| Sewing Area: | 98mm (3.86") x 98mm (3.86") |
| Needle Type: | Flat Shank Domestic |
| Bobbin Type: | Unique |
| Read Formats: | HUS |
| Please message us if you have additional info on this machine. | |
Machine is also known as the Orchidea
Manual:https://www.husqvarnaviking.com/SiteFiles/ClientSi...

I have the foot are you still interested???


Hi Shannon,
Our company doesn't sell parts to the machines. Since we're a company that sells embroidery supplies. But I'd recommend that you try sewingpartsonline.com, and maybe they'll have a walking foot. Best of luck, and have a great day!
I inherited my mother-in-law’s Husqvqrna Viking +1, I have no idea how to use it. I am trying to find out how old this machine is and if it requires oiling. It has not been used since she passed which is about 10 years ago. I do have a moderate amount of sewing experience. Is their a “how to manual” of care and use?
Caro
hi Carol I am right there with you. My Grandmother (Professional Seamstress) purchased the Model #1+ 1250 w/ ALL the accessories in 1990 or 1991 when it was first released. She passed back in 2018 and my mom became the new owner. Unfortunately my mother also passed on 2020 which then made me a proud owner of a machine with all the bells and whistles in which I sit and kick myself in the behind for not wanting to learn to sew when my GM tried to teach me (stupid teenager with the mindset of "wouldn't catch me dead wearing anything but what was purchased from retail stores (Levi's & Jordache jeans era).". I am at the basic beginner level know how to thread a machine and push the foot pedal LOL. Ive had my GMs 1979 Viking Selectrinic 6570 w/ ALL the accessories & (?? year released ) Viking Model 1040 Zig Zag Machines for years and the only thing I have actually made start to finish is a drawstring backpack.
I wish I could find a hands on course to learn the basics (pattern cutting, fabric types & what stich for them, ECT). there is a Husqvarna Viking Store about a mile away but when I've been in to have service and/or repairs on my zig zag or GMs machines, I only see courses that use new program able (as in like a CNC machine that you type in what you want the machine to do, push start and walk away (returning once the project is complete). nothing low level as I would require. ??
enough rambling.... hope you learn all you can and graduate to pro level seamstress. ??

Hi Carol,
Yes! There is a manual for this machine. It's available as a printable or onscreen viewable PDF file here:
https://www.husqvarnaviking.com/SiteFiles/ClientSi...
And here's a video tutorial that introduces many of the same things as the printable manual:
I to have the #1+ machine and am trying to figure it out. I am testing the #15 embroidery card and it seems to only complete the first 1/3 of the design and then starts it all over from the beginning. I’m not getting any error messages. Would you have any suggestions or ideas. I also don’t have the manual for the #15 card so I am at a loss.
It's possible that #15 is in two pieces. Is there a second file on the card?
It now looks like to me that some of the larger designs are split up into 2 and sometimes 3 files. (See the attached photo).
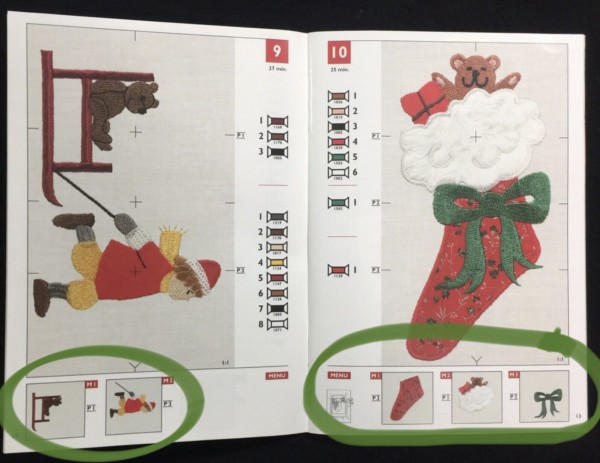
Which explains why I am only getting 1/3rd of my design. On my sewing machine screen when I start my design it shows “P1” which I have to think is position 1. I have my fabric and hoop in the corresponding “P1” position, I just need to figure out how when it is done with the first part of the design to switch my machine to the 2nd and then the 3rd position to complete the design.
I have searched everywhere for a manual to help explain but can’t find anything. Any suggestions you or anyone else has would be greatly appreciated.
Sheila,
I found a video that walks you through using the different positions on the Mega Hoop:
It's for the platinum plus, so I'm not sure how relevant it will be for your machine; sometimes they're similar from model to model, but not always.
I’ll give it a try and let you know. Thank you
Hi Sheila,
Maybe this will help: I found someone giving instructions for moving to different positions for the #21 card. It seems to be partly the same question you have, at least before it gets into font selection. I have never personally used a multi-position or plus hoop, but it sounds to me like to move to position 2, you might the rotational arrow, and then then you might see the F1 S1 M1 options in the right side of the window. I think you would press M1,2,or 3 in order to select position 1, 2, or 3.
Here's where I found it:
https://www.fixya.com/support/t1807875-hv_1_embroi...
And here's the help that was given:
Slide in embroidery card 21 and companion cassette. Touch Embroidery ON.
Touch FUNC to Program mode, The “E” inside the hoop will appear on the left end of the Program display window. If Plus Hoop programming is desired, touch the rotational arrow E one time and you will see the hoop in the Program display window change into a Plus Hoop with a small arrow pointing to the top portion of the hoop, indicating position 1.
Toward the right side of the Program display window are
F1 S1 M1. F1 = Font style (1, 2 or 3), S1 = Size (1 or 2) and M1 = Menu (1, 2 or 3).
Here's a second set of instructions that look like they might be helfpul:
https://www.fixya.com/support/t975246-use
The plus hoop is a multi positional hoop that allows you you to embroider designs up to 4" x 6". It is essential for monogramming and lettering using your Rose. The Rose hooping system is the same as the 1+, the Scandinavia 300 and 400.
The designs you use must be formatted for the plus hoop. That is, the design has already been divided into two or three elements. Each element is an individual design. For instance, say the design is a long stemmed rose. It would probably be divided something like this: design 1: the flower and the top part of the stem, design 2: The middle part of the stem and the leaves, design 3: the bottom part of the stem.
You would hoop up your fabric to be embroidered, attach the hoop to the machine, set the hoop to position 1, select design 1, stitch out design 1, set the hoop to position 2, select design 2, stitch out design 2, set the hoop to position 3, select design 3, stitch out design 3. You should have a complete design when you're done and everything should match up perfectly!
The hoop is divided up into three squares, 4" x 4". Position 1 square overlaps position 2 square and position 2 square overlaps position 3 square. This overlapping allows the designs to stitch out more smoothly.
I hope this helps. Let me know if you have further questions. Carrie
Here’s an update. The second blog you gave me (https://www.fixya.com/support/t975246-use) worked like a gem. After the program is done in position #1 you will press the menu button on the cassette to proceed to the next position. With the incoming cold weather I now have a great project to look for to. Thank you so much for all of your help. I can’t tell you how much I appreciate it
Sheila I am so glad to hear that! Thank you for coming back with the information to help others. Enjoy your project :)
This is the best information I have seen. It is starting to make a little more sense now. Thank you, I’ll let you know if it works out this weekend when I can get back to sewing. Your wonderful!!
Thank you for such a quick response. I truly appreciate it. I am totally lost with this monster machine, but I have promised myself tot at least give it a try. Can you tell what the age of this machine is?
Thank you!
Hi Carol, I believe it began manufacture in 1994.
I have a Husqvarna viking +1 and have a readable card, what can I get to read the card. I have tried Magic Box elite and wont read card.

Hi, Susan. We'd recommend the Ultimate Box Basic or Plus, both of which are available at Embroidery.com.
https://www.embroidery.com/Vikant-Ultimate-Box.ec?page=1
~Heather
[email protected]
I have this machine and am trying to get it to function in the embroidery capacity. Any tutorials
do you have embroidery software for this machine?
We have Embrilliance software. It works great on designs for the 1+. To begin with, I would suggest Thumbnailer (to instantly view your designs without having to open them), and Essentials for editing your designs, like adding lettering, changing colors, merging and removing design elements.
If you need to transfer designs from computer to the machine, and don't have a card writer already, then I would suggest the Ultimate Box.
Shannon S.
I am looking for a walking foot for this machine. Any tips? Thanks!