Digitizing Fringe in Generations Embroidery Software
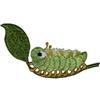
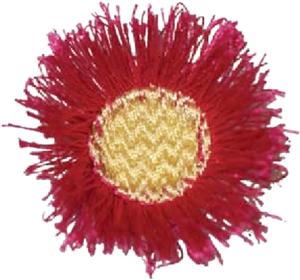
Fringing is a fun accent and easy novelty technique to add to designs-- and it's easy to digitize! In this Quick Project, you’ll learn clever ways to get Generations to work for you. Included with this project are five designs: four created from this lesson and the final one is an example of how to use fringing in a design. All were digitized in Generations using manual techniques.
What You'll Learn
- How to digitize a design without using pre-existing artwork
- How to take advantage of the grid
- How to create fringe
- How to use the Punch Ring tool
- How to eliminate travel stitches
- How to emboss
- How to create an area from a line
- How to change stitch properties
- How to create the fringe after sewing
- Some ideas and tips for working with fringe
What You'll Need
- A computer with Generations digitizing software loaded and operational
- Light familiarity with Generations menus, palettes, and operation
- An embroidery machine with a minimum sewing field of 50mm x 70mm
- Suitable embroidery supplies for test sewing (threads, needles, stabilizers, fabric)
What's Included
- One 24-page, full color illustrated step-by-step PDF
- Four sample designs created for this project in Generations format
- One free design to demonstrate use of fringing in a "real world" scenario in native Generations format